TsgcHTTP_OAuth2_Client
When a client needs a new Access Token, automatically starts an HTTP server to process response from Authorization server.
Introduction
This component allows you to handle flow between client and the other roles, basically, when you set Active := True, opens a new Web Browser and requests user grant authorization, if successful, authorization server sends a token to application which is processed and with this token, client can connect to resource server. This component, starts a simple HTTP server which handles authorization server responses and uses an HTTP client to request Access Tokens.
GrantType
Client supports the following types of Authorization:
auth2Code: It's used to perform authentication and authorization in the majority of application types, including single page applications, web applications, and natively installed applications. The flow enables apps to securely acquire access_tokens that can be used to access resources secured, as well as refresh tokens to get additional access_tokens, and ID tokens for the signed in user.
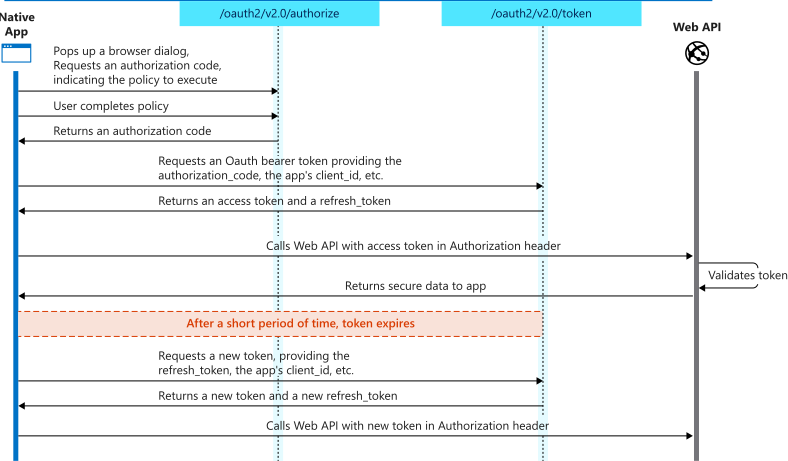
auth2CodePKCE: it's the same authentication flow than auth2Code with PKCE enabled. PKCE (Proof Key for Code Exchange) is a security extension for OAuth 2.0, designed to enhance the security of authorization flows for native and single-page applications. It mitigates the risk of interception attacks, especially in public clients where the authorization code might be exposed to interception in transit. Usually this option is used in native and mobile apps.
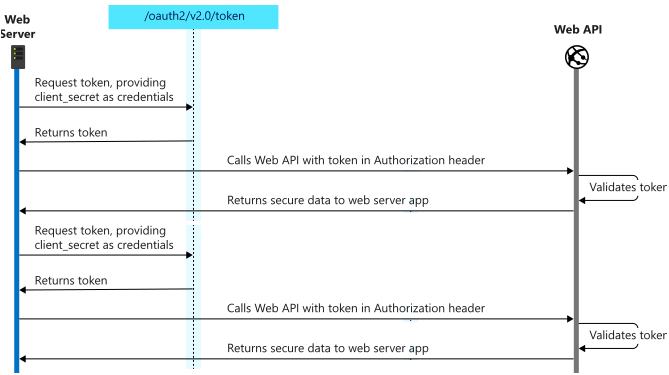
auth2ClientCredentials: This type of grant is commonly used for server-to-server interactions that must run in the background, without immediate interaction with a user. These types of applications are often referred to as daemons or service accounts.
auth2DeviceCode: Device Authorization Grant (RFC 8628) for input-constrained devices such as smart TVs, media consoles, and IoT devices that lack a browser or have limited input capabilities. The device displays a user code and verification URI; the user visits the URI on a secondary device (phone or computer) and enters the code to authorize.
LocalServerOptions
When a client needs a new Access Token, automatically starts an HTTP server to process response from Authorization server. This server is transparent for user and usually works in localhost. By default uses port 8080 but you can change if needed.
- IP: IP server listening, example: 127.0.0.1
- Port: by default 8080. When using GrantType = auth2CodePKCE (for desktop and native application), you can set the value of the port to zero and the server will choose a random port.
- RedirectURL: (optional) allows customizing the redirect URL, example: http://localhost:8080/oauth/.
- SSL: enable this property if local server runs on a secure port (*only supported by Professional and Enterprise Editions).
- SSLOptions: allows customizing the SSL properties of server (*only supported by Professional and Enterprise Editions).
- LogOptions: allows you to save the log of the Requests/Responses received and sent by the HTTP Internal Server (*Only for Professional and Enterprise Editions).
- Enabled: set to True to enable the log to file.
- FileName: set the file name to store the log file.
AuthorizationServerOptions
Here you must set URL for Authorization and Acces Token, usually these are provided in API specification. Scope is a list of all scopes requested by client. Example:
- AuthURL: https://accounts.google.com/o/oauth2/auth
- TokenURL: https://accounts.google.com/o/oauth2/token
- Scope: https://mail.google.com/
- RevocationURL: URL for token revocation endpoint (required for Revoke method). Example: https://accounts.google.com/o/oauth2/revoke
- IntrospectionURL: URL for token introspection endpoint (required for Introspect method). Example: https://accounts.google.com/o/oauth2/introspect
OAuth2Options
ClientId is a mandatory field which informs server which is the identification of client. Check your API specification to know how get a ClientId. The same applies for client secret.
Sometimes, server requires a user and password to connect using Basic Authentication, if this is the case, you can setup this in Username/Password fields. Example:
- GrantType: Authorization flow type
- auth2Code: trusted apps, like a web-server.
- auth2CodePKCE: untrusted native or mobile apps.
- auth2ClientCredentials: automated apps without user interaction.
- auth2ResourceOwnerPassword: allows an application to sign in the user by directly handling their password
- auth2DeviceCode: Device Authorization Grant (RFC 8628) for input-constrained devices without a browser or with limited input capabilities.
- ClientId: 180803918307-eqjtm20gqfhcs6gjklbbrreng022mqqc.apps.googleusercontent.com
- ClientSecret: _by1iYYrvVHxC2Z8TbtNEYJN
- Username:
- Password:
HTTPClientOptions
Here you can customize the Client Options when connects to HTTP Server to request a new token.
TLSOptions: if TLS enabled, here you can customize some TLS properties.
ALPNProtocols: list of the ALPN protocols which will be sent to server.
RootCertFile: path to root certificate file.
CertFile: path to certificate file.
KeyFile: path to certificate key file.
Password: if certificate is secured with a password, set here.
VerifyCertificate: if certificate must be verified, enable this property.
VerifyDepth: is an Integer property that represents the maximum number of links permitted when verification is performed for the X.509 certificate.
Version: by default uses TLS 1.0, if server requires a higher TLS version, here can be selected.
IOHandler: select which library you will use to connect using TLS.
iohOpenSSL: uses OpenSSL library and is the default for Indy components. Requires to deploy openssl libraries for win32/win64.
iohSChannel: uses Secure Channel which is a security protocol implemented by Microsoft for Windows, doesn't require to deploy openssl libraries. Only works in Windows 32/64 bits.
OpenSSL_Options: allows defining which OpenSSL API will be used.
APIVersion: allows defining which OpenSSL API will be used.
oslAPI_1_0: uses API 1.0 OpenSSL, it's latest supported by Indy
oslAPI_1_1: uses API 1.1 OpenSSL, requires our custom Indy library and allows using OpenSSL 1.1.1 libraries (with TLS 1.3 support).
oslAPI_3_0: uses API 3.0 OpenSSL, requires our custom Indy library and allows using OpenSSL 3.0.0 libraries (with TLS 1.3 support).
LibPath: here you can configure where are located the openSSL libraries
oslpNone: this is the default, the openSSL libraries should be in the same folder where is the binary or in a known path.
oslpDefaultFolder: sets automatically the openSSL path where the libraries should be located for all IDE personalities.
oslpCustomFolder: if this is the option selected, define the full path in the property LibPathCustom.
LibPathCustom: when LibPath = oslpCustomFolder define here the full path where are located the openSSL libraries.
UnixSymLinks: enable or disable the loading of SymLinks under Unix systems (by default is enabled, except under OSX64):
oslsSymLinksDefault: by default are enabled except under OSX64 (after MacOS Monterey fails trying to load the library without version.).
oslsSymLinksLoadFirst: Load SymLinks and do before trying to load the version libraries.
oslsSymLinksLoad: Load SymLinks after trying to load the version libraries.
oslsSymLinksDontLoad: don't load the SymLinks.
SChannel_Options: allows you to use a certificate from Windows Certificate Store.
CertHash: is the certificate Hash. You can find the certificate Hash running a dir command in powershell.
CertStoreName: the store name where is stored the certificate. Select one of below:
scsnMY (the default)
scsnCA
scsnRoot
scsnTrust
CertStorePath: the store path where is stored the certificate. Select one of below:
scspStoreCurrentUser (the default)
scspStoreLocalMachine
LogOptions: if a filename is set, it will save a log of HTTP requests/responses of the HTTP client
Reference
- Properties — 6 properties available on the component.
- Methods — 7 public methods.
- Events — 19 events you can handle.