Authorization using PassKeys

WebAuthn (Web Authentication) is a W3C standard that enables secure, passwordless, and phishing-resistant authentication using public-key cryptography. It's widely used with passkeys to improve security and user experience. However, authenticating users with WebAuthn is just the first step — after successful authentication, you often need to authorize their actions across multiple API endpoints.
In this article, we'll cover how to:
- Use WebAuthn for passkey-based authentication.
- Receive a bearer token from your WebAuthn server.
- Use the returned bearer token to authorize subsequent HTTP requests.
1. Understanding WebAuthn Authentication Flow
WebAuthn revolves around public-key cryptography and credentials stored securely on the client (e.g., passkeys in the browser or device). The authentication flow generally involves these steps:
Step 1: Initiate Authentication- The client (browser/app) requests a WebAuthn challenge from the server.
- The server generates a challenge and sends it to the client.
- The browser uses the WebAuthn API (
navigator.credentials.get) to sign the challenge using a private key stored in a passkey. - The signed assertion is sent back to the server.
- The WebAuthn server verifies the assertion using the corresponding public key.
- If valid, the server authenticates the user.
At this point, you have confirmed who the user is, but you still need a way to authorize access to your APIs.
2. Returning a Bearer Token After WebAuthn Success
If you want that after a successful authentication the server sends a bearer token that will be used to open a new websocket or HTTP connection, pass the parameter token = true. Example:
{
 "username": "alice@example.com", "token": true
}
After a successful Authentication, the server will send a response like this:
{
 "verified": "ok",
   "authentication": {
     "token": "C760C1C39E3D4E829693A13F18F5CFDE537B516336FC48F7BAB0276176F9E6DE"
   }
}
The event OnWebAuthnUnauthorized is called when a request is not authorized and will be disconnected, here you can configure which endpoints require WebAuthn Authentication and which not.
Why Use a Bearer Token?
- It eliminates the need to re-authenticate on every request.
- It allows stateless authorization across microservices.
- It integrates seamlessly with modern API security patterns.
3. Using the Bearer Token for API Authorization
Once you have a new token, just send an authorization header with this bearer token. You can use the CustomHeaders property of the TsgcHTTP1Client to configure the Bearer Token. Example:
procedure GetHTTPRequest(const aURL: string; const aToken: string): string;
var
  oHTTP: TsgcHTTP1Client;
begin
  oHTTP := TsgcHTTP1Client.Create(nil);
  Try
    oHTTP.Request.CustomHeaders.AddValue('Authorization', 'Bearer ' + aToken);
    result := oHTTP.Get(aURL);
  Finally
    oHTTP.Free;
  End;
end;
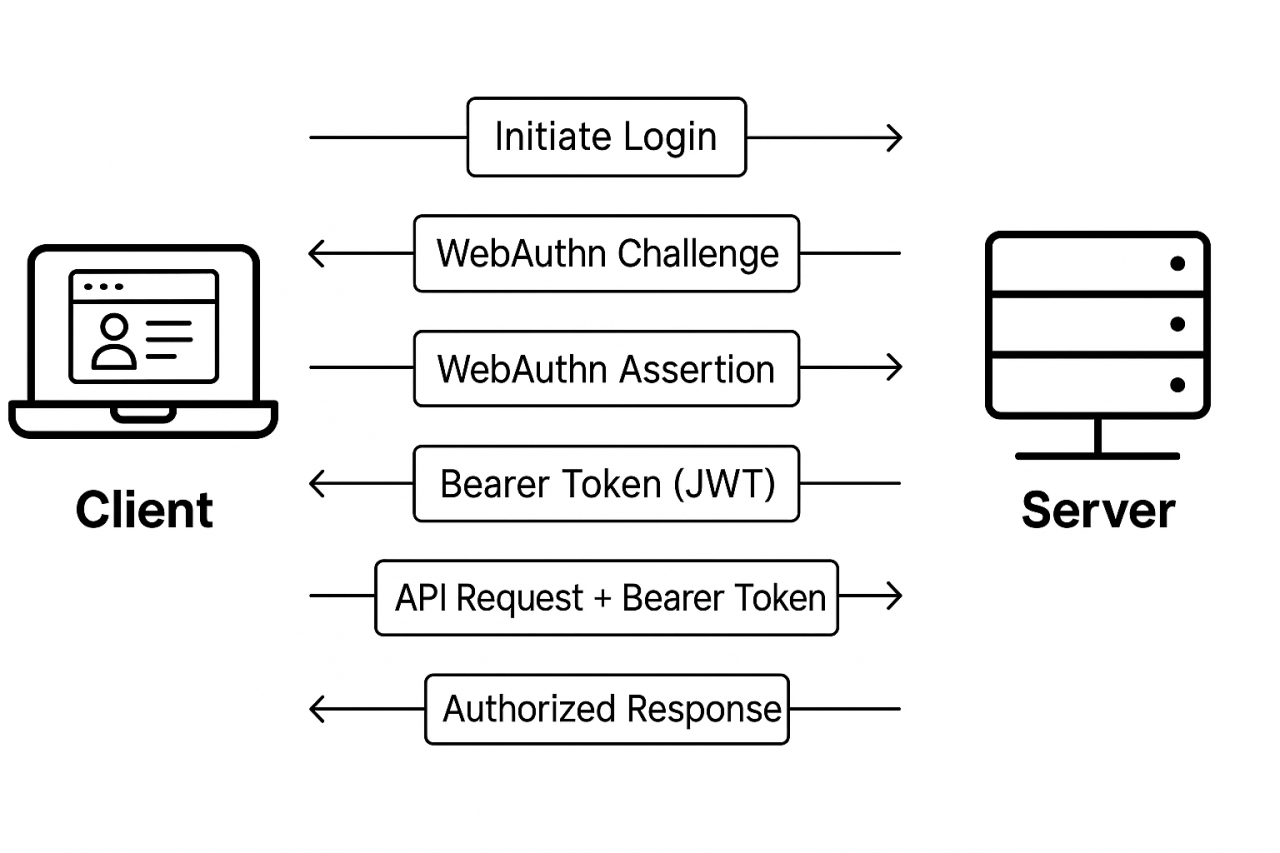
4. End-to-End Flow Overview
Here's the complete high-level sequence:
When you subscribe to the blog, we will send you an e-mail when there are new updates on the site so you wouldn't miss them.